Thursday, 22 September 2016

Internet & World Wide Web (WWW)

Internet & WWW


The Internet or simply the Net is a worldwide network of computer networks. It is an interconnection of large and small networks around the globe.

The Internet is a worldwide telecommunications system that provides connectivity for millions of other, smaller networks; therefore, the Internet is often referred to as a network of networks. It allows computer users to communicate with each other across distance and computer platforms.

The Internet began in 1969 as the U.S. Department of Defense's Advanced Research Project Agency (ARPA) to provide immediate communication within the Department in case of war. Computers were then installed at U.S. universities with defense related projects. As scholars began to go online, this network changed from military use to scientific use. As ARPAnet grew, administration of the system became distributed to a number of organizations, including the National Science Foundation (NSF). This shift of responsibility began the transformation of the science oriented ARPAnet into the commercially minded and funded Internet used by millions today.

The Internet acts as a pipeline to transport electronic messages from one network to another network. At the heart of most networks is a server, a fast computer with large amounts of memory and storage space. The server controls the communication of information between the devices attached to a network, such as computers, printers, or other servers.

You can connect to the Internet through telephone lines, cable modems, cellphones and other mobile devices.


Application of Internet :

1) Exchange messages using e-mail (Electronic mail).
2) Transfer files as well as software.
3) Browse through information on any topic on web.
4) Communicate in real time (chat) with others connected to the Internet.
5) Search databases of government, individuals and organizations.
6) Read news available from leading news groups.
7) Send or receive animation and picture files from distant places.
8) Set up a site with information about your company’s products and services.

Getting Internet Connection on your computer


Any terminal to activate internet services on it require a internet connection from a Internet Service Provider. To have a connection one needs to contact the Internet Service Providers. There are several Internet Service Providers (ISP) in each locality. There are some nominal charges that you need to pay to the ISP for the installation of the connection and for the rent (either monthly or annually). Depending on the requirement you can choose any one of the available options. If you need a high speed dedicated network then you can opt for a high bandwidth broadband or leased line connection.
If you need to have connection on a single PC then you choose a low bandwidth or dialup connection . For small services at your hand you can even have mobile phones connected to your Internet. There are many ways to get connected to the Internet. You can get internet connection in any of the following ways:
1. through dial-up connection : user is supposed to get connected to the internet after dialing up the number used for connection. This is useful if your network is either confined to small group of computers or for a single PC.
2. through leased lines: in this a dedicated line is laid specifically for connection.
3. though broadband: in this you can get a broadband connection which provides a high bandwidth for the internet connection. This also provides a good speed. These days even wireless connections are available. For this you need to have a Wi Fi card attached to your computer which can be useful if you do not have proper place to lay down the wires.
To connect to the Internet you need a PC (personal computer) with requisite software including a browser, a telephone connection or a leased line, and a modem, which allows the PC to communicate with other computers.


World Wide Web:

The Internet is often confused with the World Wide Web. The misconception is that these two terms are synonymous. The Internet is the collection of the many different systems and protocols. The World Wide Web, developed in 1989, is actually one of those different protocols. As the name implies, it allows resources to be linked with great ease in an almost seamless fashion.

The World Wide Web contains a vast collection of linked multimedia pages that is ever-changing. However, there are several basic components of the Web that allow users to communicate with each other. Below you will find selected components and their descriptions.

Domain name system 


An Internet address has four fields with numbers that are separated by periods or dots. This type of address is known as an IP address. Rather than have the user remember long strings of numbers, the Domain Name System (DNS) was developed to translate the numerical addresses into words. For example, the address fcit.usf.edu is really 131.247.120.10.


URLs 


Addresses for web sites are called URLs (Uniform Resource Locators). Most of them begin with http (HyperText Transfer Protocol), followed by a colon and two slashes.


Top-level domain 

Each part of a domain name contains certain information. The first field is the host name, identifying a single computer or organization. The last field is the top-level domain, describing the type of organization and occasionally country of origin associated with the address.

Top-level domain names include:
.comCommercial
.eduEducational
.govUS Government
.intOrganization
.milUS Military
.netNetworking Providers
.orgNon-profit Organization


MS Excel

What is Excel? 

Microsoft Excel is a general-purpose electronic spreadsheet used to organize, calculate, and analyze data. The task you can complete with Excel ranges from preparing a simple family budget, preparing a purchase order, create an elaborate 3-D chart, or managing a complex accounting ledger for a medium size business.

Ribbon:

The tabs on the ribbon are: File, Home, Insert, Page layout, Formulas, Data, Review and View. The Home tab contains the most frequently used commands in Excel.


Minimize the Ribbon

You can minimize the ribbon to get extra space on the screen. Right click anywhere on the ribbon, and then click Minimize the Ribbon (or press CTRL + F1).

Customize the Ribbon

Excel 2010 makes it possible to easily create your own tab and add commands to it. If you are new to Excel, you can skip this paragraph.
1. Right click anywhere on the ribbon, and then click Customize the Ribbon.

2. Click New Tab.

3. Add the commands you like.


4. Rename the tab and group.


Note: you can also add new groups to existing tabs. To hide a tab, uncheck the corresponding check box. Click Reset, Reset all customizations, to delete all ribbon and Quick Access Toolbar customizations.
Result.

Workbook


workbook is another word for your Excel file. Excel automatically creates a blank workbook when you open it.

Open an Existing Workbook

To open a workbook you've created in the past, execute the following steps.
1. Click on the green File tab.

2. Recent shows you a list of your recently used workbooks. You can quickly open a workbook from here.


Create a New Workbook

Although Excel creates a blank workbook when you open it, sometimes you want to start all over again.
1. To create a new workbook, click New and then click Create.

Worksheets

A worksheet is a collection of cells where you keep and manipulate the data. By default, each Excel workbook contains three worksheets.

Select a Worksheet

When you open Excel, Excel automatically selects Sheet1 for you. The name of the worksheet appears on its sheet tab at the bottom of the document window.

To select one of the other two worksheets, simply click on the sheet tab of Sheet2 or Sheet3.

Rename a Worksheet

By default, the worksheets are named Sheet1, Sheet2 and Sheet3. To give a worksheet a more specific name, execute the following steps.
1. Right click on the sheet tab of Sheet1.
2. Choose Rename.


Insert a Worksheet

You can insert as many worksheets as you want. To quickly insert a new worksheet, click the Insert Worksheet tab at the bottom of the document window.

Move a Worksheet

To move a worksheet, click on the sheet tab of the worksheet you want to move and drag it into the new position.

Delete a Worksheet

To delete a worksheet, right click on a sheet tab and choose Delete.

Copy a Worksheet

Imagine, you have got the sales for 2010 ready and want to create the exact same sheet for 2011, but with different data. You can recreate the worksheet, but this is time-consuming. It's a lot easier to copy the entire worksheet and only change the numbers.
1. Right click on the sheet tab of Sales 2010.
2. Choose Move or Copy...

Format Cells


When we format cells in Excel, we change the appearance of a number without changing the number itself. We can apply a number format (0.8, $0.80, 80%, etc) or other formatting (alignment, font, border, etc).
1. Enter the value 0.8 into cell B2.

By default, Excel uses the General format (no specific number format) for numbers. To apply a number format, use the 'Format Cells' dialog box.

2. Select cell B2.
3. Right click, and then click Format Cells (or press CTRL + 1).

The 'Format Cells' dialog box appears.
4. For example, on the Number tab, select Currency.


Note: Excel gives you a life preview of how the number will be formatted (under Sample).
5. Click OK.
Cell B2 still contains the number 0.8. We only changed the appearance of this number, not the number itself. The most frequently used formatting commands are available on the Home tab.

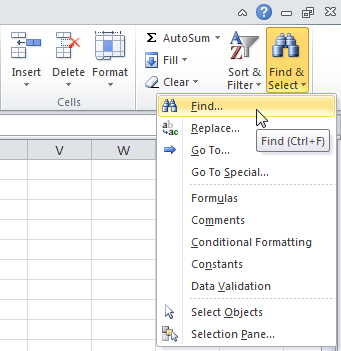
Find & Select


You can use Excel's Find and Replace feature to quickly find specific text and replace it with other text. You can use Excel's Go To Special feature to quickly select all cells with formulas, comments, conditional formatting, constants, data validation, etc.

Find

To quickly find specific text, execute the following steps.
1. On the Home tab, click Find & Select, Find...

The 'Find and Replace' dialog box appears.
2. Type the text you want to find. For example, type Ferrari.
3. Click 'Find Next'.


Replace

To quickly find specific text and replace it with other text, execute the following steps.
1. On the Home tab, click Find & Select, Replace...

The 'Find and Replace' dialog box appears (with the Replace tab selected).
2. Type the text you want to find (Veneno) and replace it with (Diablo).
3. Click 'Find Next'.


Go To Special

You can use Excel's Go To Special feature to quickly select all cells with formulas, comments, conditional formatting, constants, data validation, etc. For example, to select all cells with formulas, execute the following steps.
1. Select a single cell.
2. On the Home tab, click Find & Select, Go To Special...
Note: Formulas, Comments, Conditional formatting, Constants and Data Validation are shortcuts. They can also be found under Go To Special.
3. Select Formulas and click OK.

Keyboard Shortcuts


Keyboard shortcuts allow you to do things with your keyboard instead of your mouse to increase your speed.

1. To select the entire range, press CTRL + a (if you press CTRL + a one more time Excel selects the entire sheet).

2. To copy the range, press CTRL + c (to cut a range, press CTRL + x).
3. Select cell A6 and press CTRL + v to paste this range.
4. To undo this operation, press CTRL + z

Moving


1. To quickly move to the bottom of the range, hold down CTRL and press ↓

2. To quickly move to the right of the range, hold down CTRL and press →

Try it yourself. Hold down CTRL and press the arrow keys to move from edge to edge.


Selecting


1. To select cells while moving down, hold down SHIFT and press ↓ a few times.

2. To select cells while moving to the right, hold down SHIFT and press → a few times.


Print


Print a Worksheet

To print a worksheet in Excel 2010, execute the following steps.
1. On the File tab, click Print.
2. To preview the other pages that will be printed, click 'Next Page' or 'Previous Page' at the bottom of the window.
3. To print the worksheet, click the big Print button.

What to Print

Instead of printing the entire worksheet, you can also only print the current selection.
1. First, select the range of cells you want to print.
2. Next, under Settings, select Print Selection.
3. To print the selection, click the big Print button.
Note: you can also print the active sheets (first select the sheets by holding down CTRL and clicking the sheet tabs) or print the entire workbook. Use the boxes next to Pages (see first screenshot) to only print a few pages of your document. For example, 2 to 2 only prints the second page.

Multiple Copies

To print multiple copies, execute the following steps.
1. Use the arrows next to the Copies box.
2. If one copy contains multiple pages, you can switch between Collated and Uncollated. For example, if you print 6 copies, Collated prints the entire first copy, then the entire second copy, etc.

Orientation

You can switch between Portrait Orientation (more rows but fewer columns) and Landscape Orientation (more columns but fewer rows).

Page Margins

To adjust the page margins, execute the following steps.
1. Select one of the predefined margins (Normal, Wide or Narrow) from the Margins drop-down list.
2. Or click the 'Show Margins' icon at the bottom right of the window. Now you can drag the lines to manually change the page margins.

Scaling

If you want to fit more data on one page, you can fit the sheet on one page. To achieve this, execute the following steps.
1. Select 'Fit Sheet on One Page' from the Scaling drop-down list.

Protect

Encrypt an Excel file with a password so that it requires a password to open it.
1. Open a workbook.
2. On the green File tab, click Save As.
3. Click on the Tools button and click General Options.


4. In the Password to open box, enter a password and click OK.


Note: this feature also encrypts your Excel file. If you lose or forget the password, it cannot be recovered.
6. Enter a file name and click Save.

How to enter graph in MS Excel?

  • Click the Insert tab.
  • Click the chart type from the Charts section of the ribbon. The sub-type menu displays.
  • Click the desired chart sub-type. The chart appears on the worksheet.
  • If you want to create a second chart, click somewhere in the worksheet to "deselect" the current chart first, or the new chart will replace the current chart.

Deleting, Moving, and Resizing Charts

To select an existing chart, click on its border, or click in an empty space inside the chart. When selecting a chart, be careful not to click on an element inside the chart or that element will be selected instead.

How to Delete a Chart:

To delete a chart that has just been created, click the Excel Undo button. To delete an existing chart, select the chart and press the Delete key, or right-click and select Cut.

How to Move a Chart

To move a chart to a different place on the worksheet, select the chart and drag it to the desired location.
To move a chart to a new or different spreadsheet in the same workbook, select the chart, right-click, and select Move Chart. Then choose the sheet or type in a new sheet name, and click OK.

How to Resize a Chart

To resize a chart, select the chart and drag any of the chart's corners.

Excel Chart Helpful Hints

For best results, keep the Excel chart simple and uncluttered. It is better to use multiple charts to express patterns and relationships between data than to use one chart that is too busy and over-complicated.
A colorful chart is ideal for online presentations or for printing on a color printer. But shades of gray are best for monochrome printing of charts.


Tuesday, 6 September 2016

BBA-I_CAB_MS-WORD


Microsoft Office Word allows you to create and edit personal and business documents, such as letters, reports, invoices, emails and books.

By default, documents saved in Word 2010 are saved with the .docx extension. Microsoft Word can be used for the following purposes:

  • 1.To create business documents having various graphics including pictures, charts, and diagrams.
  • 2.To store and reuse ready-made content and formatted elements such as cover pages and sidebars.
  • 3.To create letters and letterheads for personal and business purpose.
  • 4.To design different documents such as resumes or invitation cards etc.
  • 5.To create a range of correspondence from a simple office memo to legal copies and reference documents.

Following is the basic window which you get when you start word application. Let us understand various important parts of this window.


File Tab:

The File tab replaces the Office button from Word 2007. You can click it to check Backstage view, which is the place to come when you need to open or save files, create new documents, print a document, and do other file-related operations.

Quick Access Toolbar:

This you will find just above the File tab and its purpose is to provide a convenient resting place for the Word most frequently used commands. You can customize this toolbar based on your comfort.

Ribbon contains commands organized in three components:
  • Tabs: They appear across the top of the Ribbon and contain groups of related commands. Home, Insert, Page Layout are example of ribbon tabs.
  • Groups: They organize related commands; each group name appears below the group on the Ribbon. For example group of commands related to fonts or or group of commands related to alignment etc.
  • Commands: Commands appear within each group as mentioned above.

Title bar:

This lies in the middle and at the top or the window. Title bar shows the program and document titles.

Rulers:

Word has two rulers - a horizontal ruler and a vertical ruler. The horizontal ruler appears just beneath the Ribbon and is used to set margins and tab stops. The vertical ruler appears on the left edge of the Word window and is used to gauge the vertical position of elements on the page.

Help:

The Help Icon can be used to get word related help anytime you like. This provides nice tutorial on various subjects related to word.

Zoom Control:

Zoom control lets you zoom in for a closer look at your text. The zoom control consists of a slider that you can slide left or right to zoom in or out, . and + buttons you can click to increase or decrease the zoom factor.

View Buttons:

The group of five buttons located to the left of the Zoom control, near the bottom of the screen, lets you switch among Word's various document views.
  • Print Layout view: This displays pages exactly as they will appear when printed.
  • Full Screen Reading view: This gives a full screen look of the document.
  • Web Layout view: This shows how a document appears when viewed by a Web browser, such as Internet Explorer.
  • Outline view: This lets you work with outlines established using Word.s standard heading styles.
  • Draft view: This formats text as it appears on the printed page with a few exceptions. For example, headers and footers aren't shown. Most people prefer this mode.

Document Area:

The area where you type. The flashing vertical bar is called the insertion point and it represents the location where text will appear when you type.

Status Bar:

This displays document information as well as the insertion point location. From left to right, this bar contains the total number of pages and words in the document, language etc.
You can configure the status bar by right-clicking anywhere on it and by selecting or deselecting options from the provided list.

Dialog Box Launcher:

This appears as very small arrow in the lower-right corner of many groups on the Ribbon. Clicking this button opens a dialog box or task pane that provides more options about the group.


Document Information:

When you click Info option available in the first column, it displays the following information in the second column of the backstage view:
  • Compatibility Mode: If the document is not a native Word 2007/2010 document, a Convert button appears here, enabling you to easily update its format. Otherwise, this category does not appear.
  • Permissions: You can use this option to protect your word document. You can set a password so that nobody can open your document, or you can lock the document so that nobody can edit your document.
  • Prepare for Sharing: This section highlights important information you should know about your document before you send it to others, such as a record of the edits you made as you developed the document.

Document Properties:

When you click Info option available in the first column, it displays various properties in the third column of the backstage view. These properties include document size, number of pages in the document, total number of words in the document author etc.
You can also edit various properties. Just try to click on the property value and if property is editable then it will display a text box where you can add your text like title, tags, comments, Author.

Moving with Keyboard:

The following keyboard commands, used for moving around your document, also move the insertion point:


You can move word by word or paragraph by paragraph. You would have to hold down the Ctrl key while pressing an arrow key, which moves the insertion point as described here:


Saving New Document:

Once you are done with typing in your new word document, it is time to save your document to avoid losing work you have done on a Word document. Following are the steps to save an edited word document:
Step (1): Click the File tab and select Save As option.


Step (2): Select a folder where you would like to save the document, Enter file name which you want to give to your document and Select a Save as type, by default it is .docx format.


Step (3): Finally, click on Save button and your document will be saved with the entered name in the selected folder.

Saving New Changes:

There may be a situation when you open an existing document and edit it partially or completely, or even you would like to save the changes in between editing of the document. If you want to save this document with the same name then you can use either of the following simple options:
  • Just press Ctrl + S keys to save the changes.
  • Optionally you can click on the floppy icon available at the top left corner and just above the File tab. This option will also save the changes.
  • You can also use third method to save the changes, which is Saveoption available just above the Save As option as shown in the above screen capture.

If your document is new and it was never saved so far, then with either of the three options, word would display you a dialogue box to let you select a folder, and enter document name as explained in case of saving new document.

Opening New Document:

A new, blank document always opens when you start Microsoft Word. But suppose that you want start another new document while you are working on another document, or you closed already opened document and want to start a new document. Here are the steps to open a new document:
Step (1): Click the File tab and select New option.


Step (2): When you select New option from the first column, it will display a list of templates in second column. Just double click on Blank document, which is very first option in the template list.


Context Sensitive Help:

This is the easiest way of getting help about any of the options available at word screen. You just need to bring your mouse pointer over an option and wait for 2 seconds, MS Word will pop-up a small balloon help giving you detail about the operation. If word has additional help for that option then it gives option Press F1 for more help as shown below when you bring your mouse pointer over colour fill option. You can press F1 key to get further help on this option.


Using the keyboard:

Keyboard provides very good support when you want to select various components of the document as described in the following table:


Using Backspace & Delete Keys:

The most basic deletion technique is to delete characters one at a time by pressing either backspace or delete keys. Following table describes how you can delete single character or whole word by using either of these two keys:


Copy & Paste Operation:

Copy operation will just copy the content from its original place and create a duplicate copy of the content at the desired location without deleting the text from it's the original location. Following is the procedure to copy the content in word:
Step (1): Select a portion of the text using any of the text selection methods.
Step (2): At second step, you have various options available to copy the selected text in clipboard. Just use any one of them which you like most:
  • Using Mouse Right Click: If right click on the selected text, it will display copy option, just click this option to copy the selected content in clipboard.
  • Using Ribbon Copy Button: After selecting a text, you can use copy button available at the ribbon to copy the selected content in clipboard.
  • Using Ctrl + c Keys: After selecting a text, just press Ctrl + c keys to copy the selected content in clipboard.
Step (3): Finally click at the place where you want to copy selected text and use either of these two simple options:
  • Using Ribbon Paste Button: Just click paste button available at the ribbon to paste the copied content at the desired location.
  • Using Ctrl + v Keys: This is simplest way of pasting the content. Just press Ctrl + v keys to paste the content at the new location.

Cut & Paste Operation:

Cut operation will cut the content from its original place and move the content from its original location to a new desired location. Following is the procedure to move the content in word:
Step (1): Select a portion of the text using any of the text selection methods.
Step (2): At second step, you have various options available to cut the selected text and put it in clipboard. Just use any one of them which you like most:
  • Using Mouse Right Click: If right click on the selected text, it will display cut option, just click this option to cut the selected content and keep it in clipboard.
  • Using Ribbon Cut Button: After selecting a text, you can use cut button available at the ribbon to cut the selected content and keep it in clipboard.
  • Using Ctrl + x Keys: After selecting a text, just press Ctrl + x keys to cut the selected content and keep it in clipboard.

Step (3): Finally click at the place where you want to move the selected text and use either of these two simple options:
  • Using Ribbon Paste Button: Just click paste button available at the ribbon to paste the content at the new location.
  • Using Ctrl + v Keys: This is simplest way of pasting the content. Just press Ctrl + v keys to paste the content at the new location.

Copy, Cut & Paste in different documents:

You can use the same procedure what we have discussed above to copy and paste or cut and paste content form one document to another document. Procedure is very simple, just copy or cut the desired content from one document and go into another document where you want to paste the content and use mentioned step to paste the content.
You can use Alt + Tab keys to switch through the different documents and select the desired destination document.

Find & Replace Operation:

Hope you are expert in searching a word or phrase in a word document as explained above. Now this section will teach you how you can replace existing word in your document. Following are the simple steps:
Step (1): Click the Replace option in the Editing group on the Home tab or press Ctrl + H to launch the Find and Replace dialog box.
Step (2): Type a word which you want to search and a word which would like to replace with in the Find and Replace dialog box as follows:
Step (3): Click Replace button available on Find and Replace dialog box and you will see first occurrence of the searched word would be replaced with the replace with word. Clicking again on Replace button would replace next occurrence of the searched word. If you will click Replace All button then it would replace all the found words in one go. You can also use Find Next button just to search the next occurrence and later you can use Replace button to replace the found word.

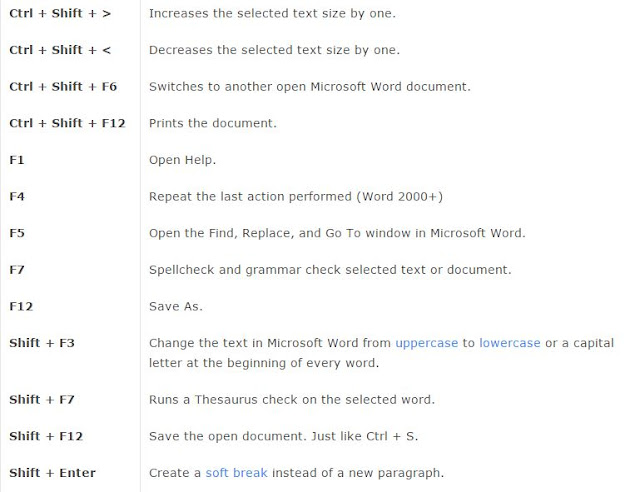
Microsoft Word shortcut keys

Below is a listing of the more commonly used shortcut keys in Microsoft Word.


You can also utilize the mouse to perform some common actions. The following section contains examples of mouse shortcuts.