
What is Excel?


2. Recent shows you a list of your recently used workbooks. You can quickly open a workbook from here.


Print


Microsoft Excel is a general-purpose electronic spreadsheet used to organize,
calculate, and analyze data. The task you can complete with Excel ranges from
preparing a simple family budget, preparing a purchase order, create an elaborate 3-D
chart, or managing a complex accounting ledger for a medium size business.
Ribbon:
The tabs on the ribbon are: File, Home, Insert, Page layout, Formulas, Data, Review and View. The Home tab contains the most frequently used commands in Excel.

Minimize the Ribbon
You can minimize the ribbon to get extra space on the screen. Right click anywhere on the ribbon, and then click Minimize the Ribbon (or press CTRL + F1).
Customize the Ribbon
Excel 2010 makes it possible to easily create your own tab and add commands to it. If you are new to Excel, you can skip this paragraph.
1. Right click anywhere on the ribbon, and then click Customize the Ribbon.

2. Click New Tab.

3. Add the commands you like.

4. Rename the tab and group.

Note: you can also add new groups to existing tabs. To hide a tab, uncheck the corresponding check box. Click Reset, Reset all customizations, to delete all ribbon and Quick Access Toolbar customizations.
Result.

Workbook
A workbook is another word for your Excel file. Excel automatically creates a blank workbook when you open it.
Open an Existing Workbook
To open a workbook you've created in the past, execute the following steps.
1. Click on the green File tab.


Create a New Workbook
Although Excel creates a blank workbook when you open it, sometimes you want to start all over again.
1. To create a new workbook, click New and then click Create.

Worksheets
A worksheet is a collection of cells where you keep and manipulate the data. By default, each Excel workbook contains three worksheets.
Select a Worksheet
When you open Excel, Excel automatically selects Sheet1 for you. The name of the worksheet appears on its sheet tab at the bottom of the document window.

To select one of the other two worksheets, simply click on the sheet tab of Sheet2 or Sheet3.
Rename a Worksheet
By default, the worksheets are named Sheet1, Sheet2 and Sheet3. To give a worksheet a more specific name, execute the following steps.
1. Right click on the sheet tab of Sheet1.
2. Choose Rename.

Insert a Worksheet
You can insert as many worksheets as you want. To quickly insert a new worksheet, click the Insert Worksheet tab at the bottom of the document window.
Move a Worksheet
To move a worksheet, click on the sheet tab of the worksheet you want to move and drag it into the new position.
Delete a Worksheet
To delete a worksheet, right click on a sheet tab and choose Delete.
Copy a Worksheet
Imagine, you have got the sales for 2010 ready and want to create the exact same sheet for 2011, but with different data. You can recreate the worksheet, but this is time-consuming. It's a lot easier to copy the entire worksheet and only change the numbers.
1. Right click on the sheet tab of Sales 2010.
2. Choose Move or Copy...
Format Cells
When we format cells in Excel, we change the appearance of a number without changing the number itself. We can apply a number format (0.8, $0.80, 80%, etc) or other formatting (alignment, font, border, etc).
1. Enter the value 0.8 into cell B2.

By default, Excel uses the General format (no specific number format) for numbers. To apply a number format, use the 'Format Cells' dialog box.
2. Select cell B2.
3. Right click, and then click Format Cells (or press CTRL + 1).

The 'Format Cells' dialog box appears.
4. For example, on the Number tab, select Currency.

Note: Excel gives you a life preview of how the number will be formatted (under Sample).
5. Click OK.
Cell B2 still contains the number 0.8. We only changed the appearance of this number, not the number itself. The most frequently used formatting commands are available on the Home tab.
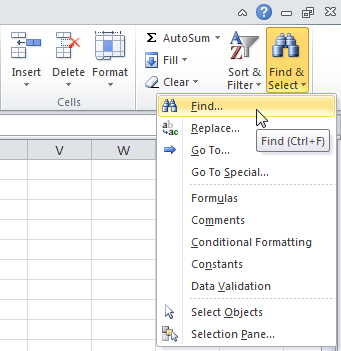
Find & Select
You can use Excel's Find and Replace feature to quickly find specific text and replace it with other text. You can use Excel's Go To Special feature to quickly select all cells with formulas, comments, conditional formatting, constants, data validation, etc.
Find
To quickly find specific text, execute the following steps.
1. On the Home tab, click Find & Select, Find...

The 'Find and Replace' dialog box appears.
2. Type the text you want to find. For example, type Ferrari.
3. Click 'Find Next'.
Replace
To quickly find specific text and replace it with other text, execute the following steps.
1. On the Home tab, click Find & Select, Replace...

The 'Find and Replace' dialog box appears (with the Replace tab selected).
2. Type the text you want to find (Veneno) and replace it with (Diablo).
3. Click 'Find Next'.

Go To Special
You can use Excel's Go To Special feature to quickly select all cells with formulas, comments, conditional formatting, constants, data validation, etc. For example, to select all cells with formulas, execute the following steps.
1. Select a single cell.
2. On the Home tab, click Find & Select, Go To Special...
Note: Formulas, Comments, Conditional formatting, Constants and Data Validation are shortcuts. They can also be found under Go To Special.
3. Select Formulas and click OK.
Keyboard Shortcuts
Keyboard shortcuts allow you to do things with your keyboard instead of your mouse to increase your speed.
1. To select the entire range, press CTRL + a (if you press CTRL + a one more time Excel selects the entire sheet).
2. To copy the range, press CTRL + c (to cut a range, press CTRL + x).
3. Select cell A6 and press CTRL + v to paste this range.
4. To undo this operation, press CTRL + z
Moving
1. To quickly move to the bottom of the range, hold down CTRL and press ↓
2. To quickly move to the right of the range, hold down CTRL and press →
Try it yourself. Hold down CTRL and press the arrow keys to move from edge to edge.
Selecting
1. To select cells while moving down, hold down SHIFT and press ↓ a few times.
2. To select cells while moving to the right, hold down SHIFT and press → a few times.
Print a Worksheet
To print a worksheet in Excel 2010, execute the following steps.
1. On the File tab, click Print.
2. To preview the other pages that will be printed, click 'Next Page' or 'Previous Page' at the bottom of the window.
3. To print the worksheet, click the big Print button.
What to Print
Instead of printing the entire worksheet, you can also only print the current selection.
1. First, select the range of cells you want to print.
2. Next, under Settings, select Print Selection.
3. To print the selection, click the big Print button.
Note: you can also print the active sheets (first select the sheets by holding down CTRL and clicking the sheet tabs) or print the entire workbook. Use the boxes next to Pages (see first screenshot) to only print a few pages of your document. For example, 2 to 2 only prints the second page.
Multiple Copies
To print multiple copies, execute the following steps.
1. Use the arrows next to the Copies box.
2. If one copy contains multiple pages, you can switch between Collated and Uncollated. For example, if you print 6 copies, Collated prints the entire first copy, then the entire second copy, etc.
Orientation
You can switch between Portrait Orientation (more rows but fewer columns) and Landscape Orientation (more columns but fewer rows).
Page Margins
To adjust the page margins, execute the following steps.
1. Select one of the predefined margins (Normal, Wide or Narrow) from the Margins drop-down list.
2. Or click the 'Show Margins' icon at the bottom right of the window. Now you can drag the lines to manually change the page margins.
Scaling
If you want to fit more data on one page, you can fit the sheet on one page. To achieve this, execute the following steps.
1. Select 'Fit Sheet on One Page' from the Scaling drop-down list.
Protect
Encrypt an Excel file with a password so that it requires a password to open it.
1. Open a workbook.
2. On the green File tab, click Save As.
3. Click on the Tools button and click General Options.

4. In the Password to open box, enter a password and click OK.


Note: this feature also encrypts your Excel file. If you lose or forget the password, it cannot be recovered.
6. Enter a file name and click Save.
How to enter graph in MS Excel?
- Click the Insert tab.
- Click the chart type from the Charts section of the ribbon. The sub-type menu displays.
- Click the desired chart sub-type. The chart appears on the worksheet.
- If you want to create a second chart, click somewhere in the worksheet to "deselect" the current chart first, or the new chart will replace the current chart.
Deleting, Moving, and Resizing Charts
To select an existing chart, click on its border, or click in an empty space inside the chart. When selecting a chart, be careful not to click on an element inside the chart or that element will be selected instead.
How to Delete a Chart:
To delete a chart that has just been created, click the Excel Undo button. To delete an existing chart, select the chart and press the Delete key, or right-click and select Cut.
How to Move a Chart
To move a chart to a different place on the worksheet, select the chart and drag it to the desired location.
To move a chart to a new or different spreadsheet in the same workbook, select the chart, right-click, and select Move Chart. Then choose the sheet or type in a new sheet name, and click OK.
How to Resize a Chart
To resize a chart, select the chart and drag any of the chart's corners.
Excel Chart Helpful Hints
For best results, keep the Excel chart simple and uncluttered. It is better to use multiple charts to express patterns and relationships between data than to use one chart that is too busy and over-complicated.
A colorful chart is ideal for online presentations or for printing on a color printer. But shades of gray are best for monochrome printing of charts.
No comments:
Post a Comment